Introduction
Back in 2020, an announcement was published that Zimperium would be integrated into the Workspace ONE Trust Network. Weirdly enough, a part from the two blogs from both vendors announcing the integration, there’s no (public) documentation available anywhere that describes how to configure the actual integration.
So when I was asked by a customer to give them a demo, I struggled on getting the MTD app to install and activate seamlessly. All I could find was this blog, written by Ryan Pringnitz back in the era of Android 10. It turned out that it was a bit outdated and resulted in errors due to missing permissions and obsolete intents.
So here’s an updated version. Hope it saves you some time!
This first part will cover the initial MTD configuration and the distribution of the Zimperium MTD app to fully managed Android devices. In a following post, I will try to demonstrate the integration with Workspace ONE Intelligence and show some remediation flows using Freestyle automation.
Components used
- Workspace ONE UEM v24.06
- Zimperium MTD console v5.32.0
- Zimperium MTD app v5.6.26.0
- Samsung SSM-T636B Android 14 (Device Owner)
- Zebra TC26 Android 11 (Device Owner)
- Intelligent Hub v24.11
UEM-MTD integration
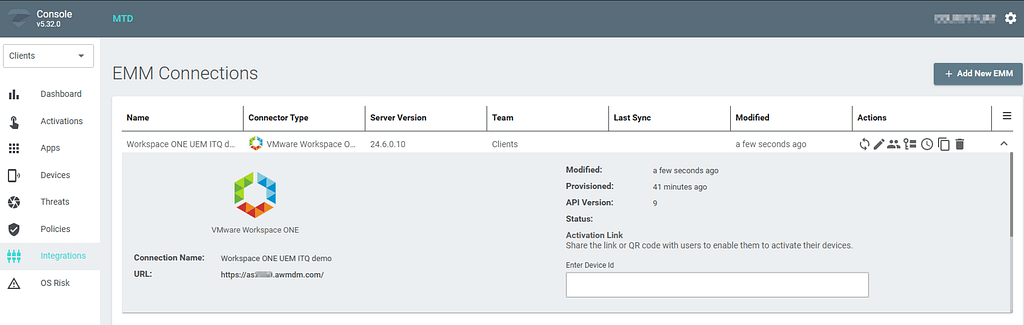
The first thing you’ll have to do is set up an EMM Connection in the Zimperium MTD console.
To be able to complete this task, you’ll need to do the following:
- Create a REST API key in Workspace ONE UEM
- Create an API admin role for Zimperium
- Create OAUTH credentials
- Configure the EMM Connection in Zimperium MTD
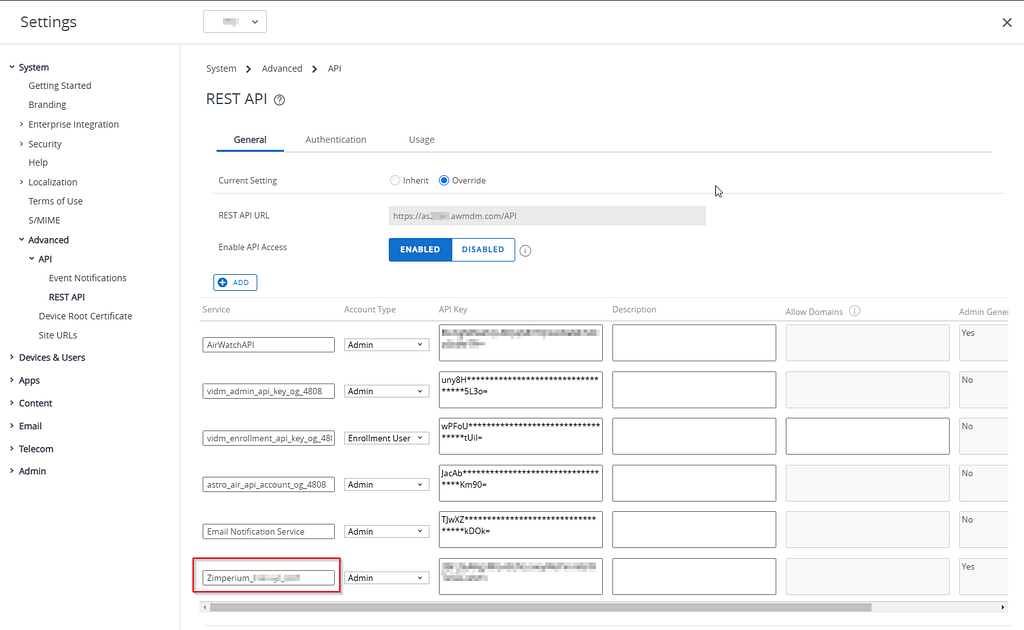
REST API key
In the Workspace ONE UEM admin console, navigate to Groups & Settings > All Settings > System > Advanced > REST API and create a new key:
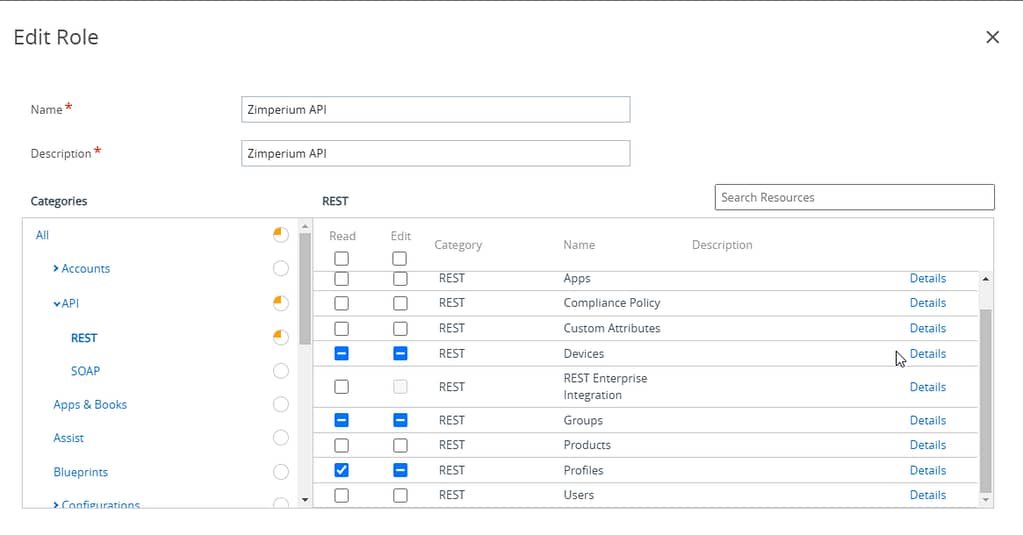
Admin Role
In the Workspace ONE UEM console, navigate to Accounts > Administrators > Roles and select Add Role to create a new role.
Select the following permissions:
API > REST:
| Sub-category | Permission | Name |
| Devices | Edit | REST API MDM Smart Groups |
| Devices | Edit | REST API MDM Profiles |
| Devices | Edit | REST API MDM Devices |
| Devices | Edit | REST API Devices Advanced |
| Devices | Read | REST API Devices Read |
| Groups | Edit | REST API Smart Groups Write |
| Groups | Edit | REST API Smart Groups Execute |
| Groups | Edit | REST API Smart Groups Delete |
| Groups | Read | REST API Smart Groups Read |
| Profiles | Read | Updates Policy Read access |
| Profiles | Read | Rest API Profiles Read |
| Profiles | Edit | Rest API Profiles Write |
| Profiles | Edit | Rest API Profiles Execute |
| Profiles | Edit | Rest API Profiles Delete |
Device Management > Bulk Management
| Sub-category | Permission | Name |
| Bulk Management | Edit | Device Bulk Management assign Tags |
Settings > Tags
| Sub-category | Permission | Name |
| Tags | Edit | Create Tag |
| Tags | Edit | Edit Tag |
| Tags | Edit | Delete Tag |
| Tags | Read | View Tag |
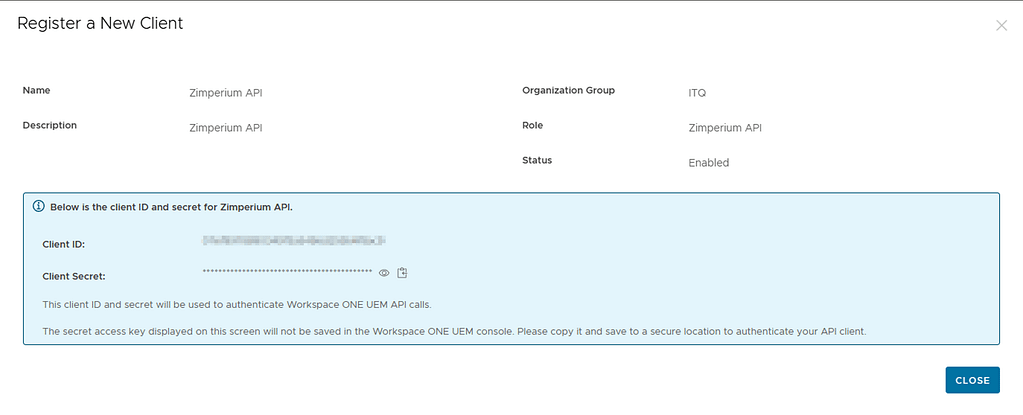
Create OAUTH Credentials
In the Workspace ONE UEM admin console, navigate to Groups & Settings > Configurations > OAUTH Client Management and select Add:

Copy your OAUTH credentials, as you’ll need to provide them in the Zimperium console:
Configure the EMM Connection
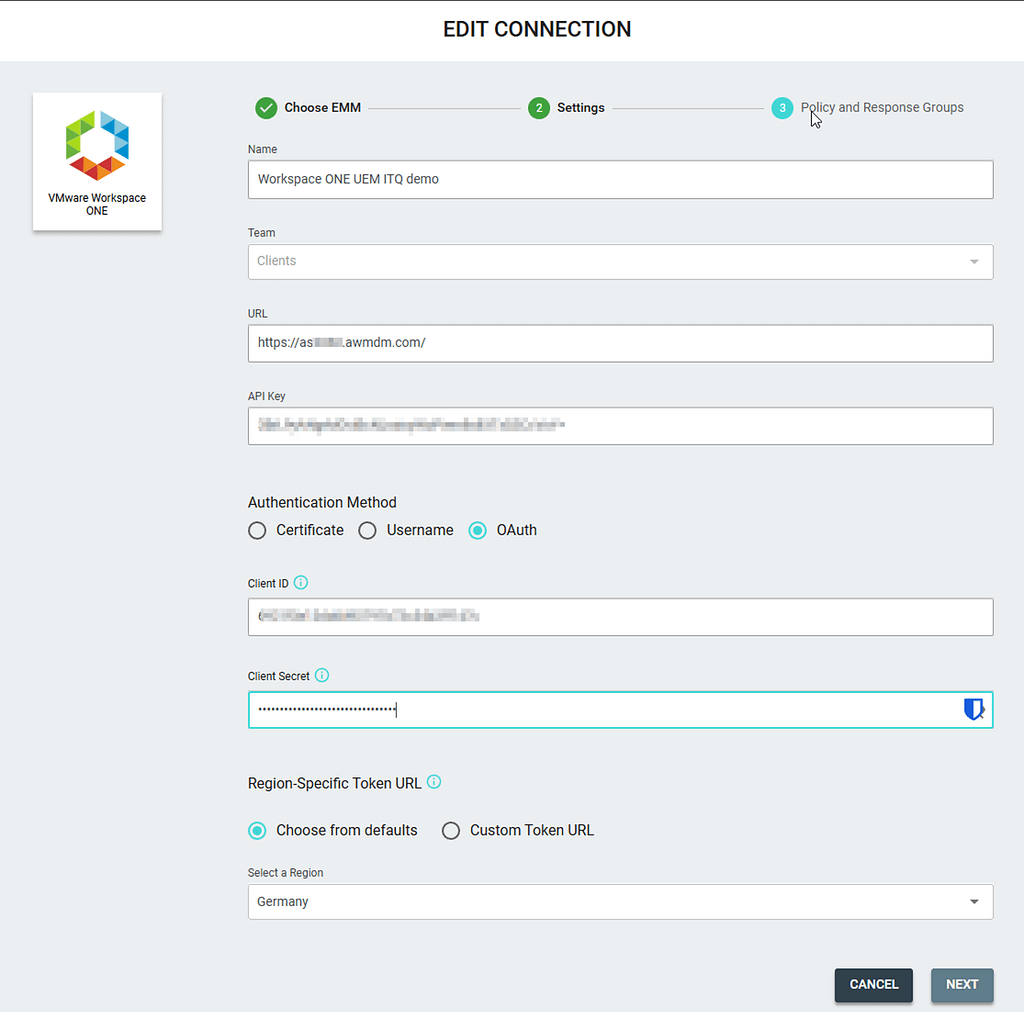
In the Zimperium MTD console, navigate to integrations and select Add new EMM. Provide The following details:
- a name for the EMM connection,
- your UEM API server URL,
- UEM API key,
- OAUTH credentials
- OAUTH token URL / region
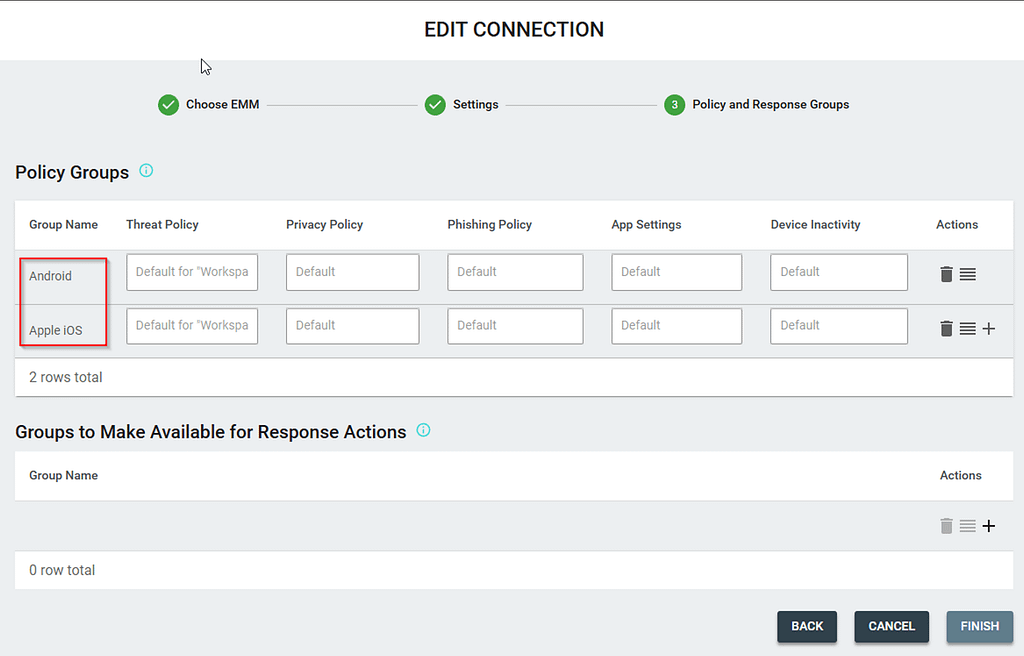
Select the device groups that you want Zimperium to sync to its console and select the policies you want to assign to these groups:
That’s all. Pretty straight forward so far…
Zimperium app distribution
This is where the real fun starts 🙂
As you can imagine, an MTD app requires some permissions to be able to monitor all that’s happening on the device. If you simply push the app to your devices, you’ll have to kindly ask your end users to approve these permissions manually and hope they comply. If they don’t (they won’t), you’ll find yourself chasing them forever.
Automatically granting these permissions silently and activating the Zimperium app requires a bit more work, as certain things need to happen in the correct order (e.g. you can’t approve the all file access permission for an app that’s not installed yet).
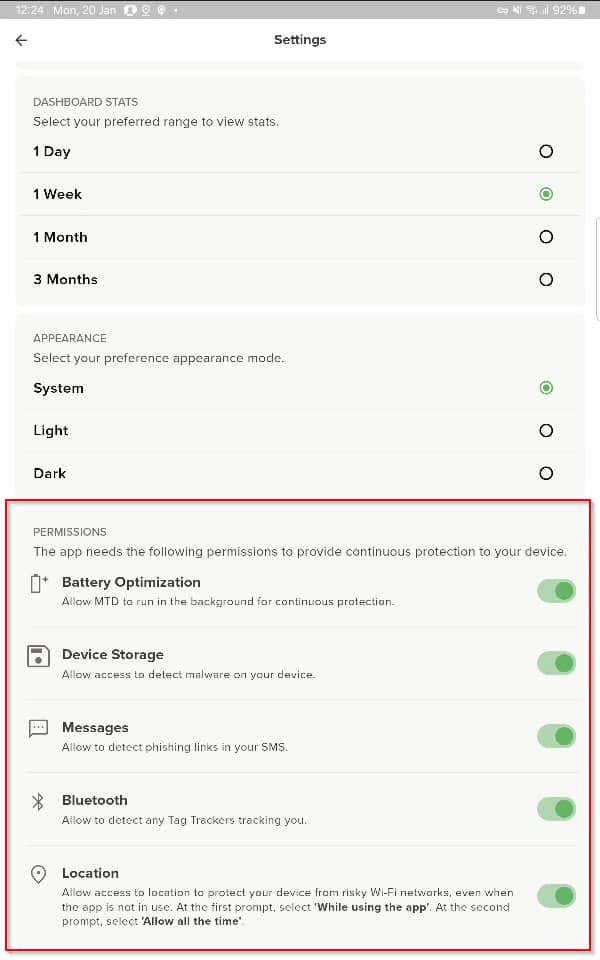
- Workspace ONE UEM has a built-in profile (App Permissions) that can configure standard permissions like the Messages, Bluetooth and Location permissions automatically (however, it turns out it’s not working correctly for the Zimperium app and requires additional steps).
- The Battery Optimization permission can’t be configured using the built-in App Permissions profile and requires its own custom configuration, as well as an OEM Service app.
- The Device Storage (MANAGE_EXTERNAL_STORAGE) permission is considered a Signature Level (a.k.a. dangerous) permission by Android and requires both a custom settings payload an OEM Service app installed on the device.
Zebra devices
To configure the Zebra device, I used the following recipe:
- App Permissions profile with an exception for Zimperium
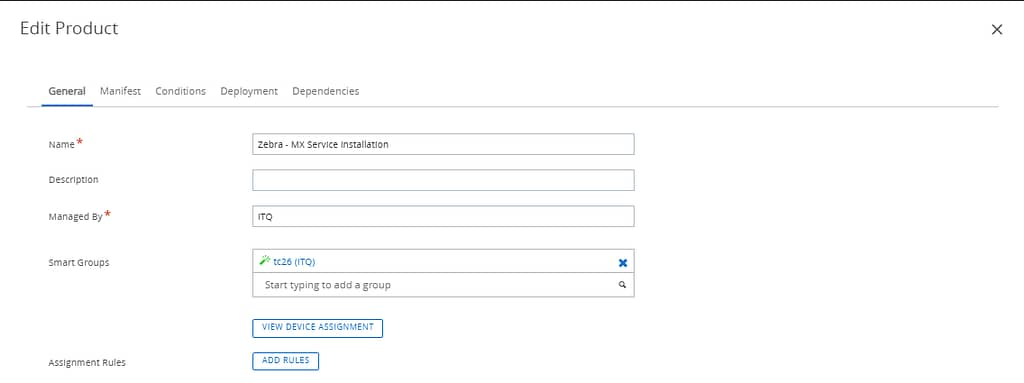
- A product that installs the Zebra MX Service app
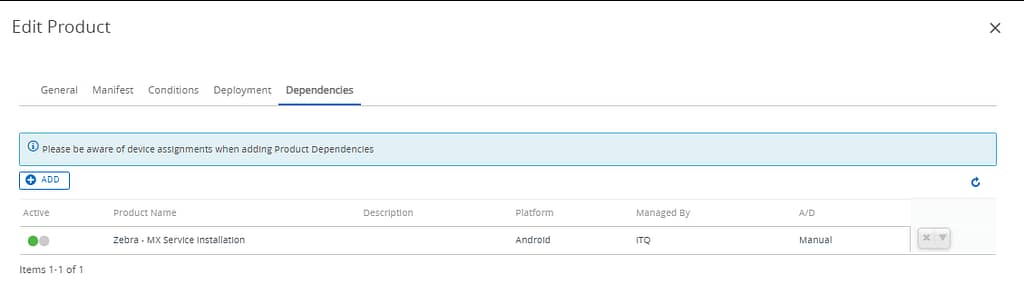
- A second Product containing:
- An app config profile, which contains the Zimperium registration details
- MTD app installation
- Profile for Manage External Storage permission
- Profile for Doze mode exclusion
- First intent to activate the MTD app
- Second intent to activate the MTD app
- (optional if using Launcher) Launcher settings to allow MTD to activate itself.
App Permissions profile
As mentioned earlier, if we were to just push an App Permissions profile set to “Grant All Permissions”, not all permissions would be granted to the Zimperium MTD app.
We’ll have to add an exception in the payload for the Zimperium app that grants all permissions (once again).
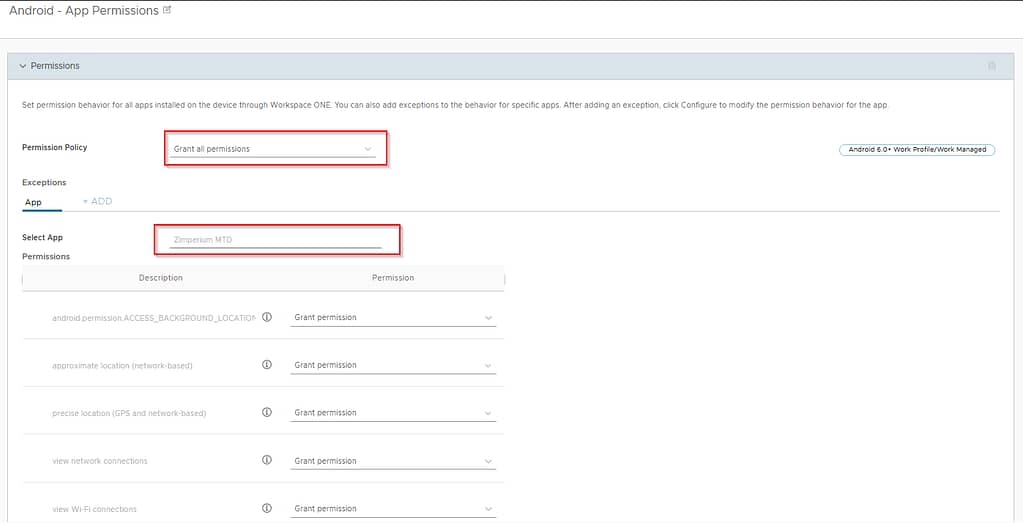
Before you can add this exception though, the app needs to be added to the console as a public app. Simply importing the app from the Play Store is enough. There’s no need to configure an assignment at this point, as we’ll be distributing the app as an in-house app using a product (we need to be able to time the installation: after the installation of Zebra MX and the app config, but before granting special permissions and running intents).

Workspace ONE Zebra MX Service app
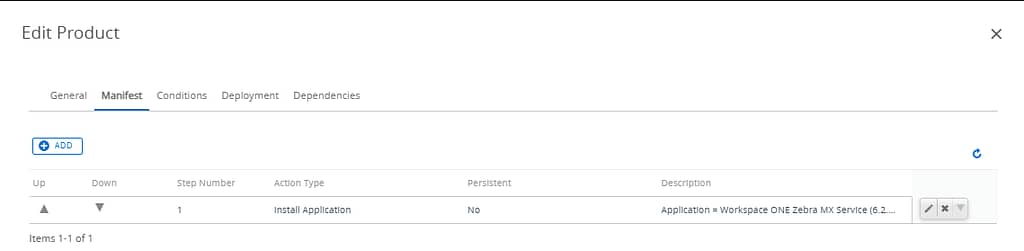
The MX Service app needs to be installed on the device first, as it is required to configure the special permissions like doze mode exclusion or all file access. I created a separate product, so the app can be updated separately whenever needed.
First, upload the app to the components section:

Next, create a product that installs the app and assign it to your target devices:
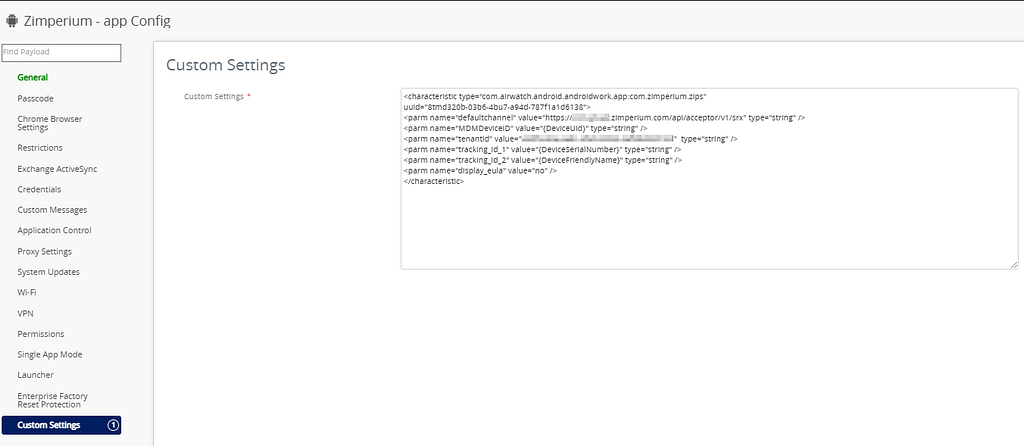
App config profile
The Zimperium MTD app needs instructions to register itself in your MTD console. These instructions can be sent to the app using a profile. To be able to complete the profile, you’ll need to head over to your MTD console and locate the EMM Configuration Values:
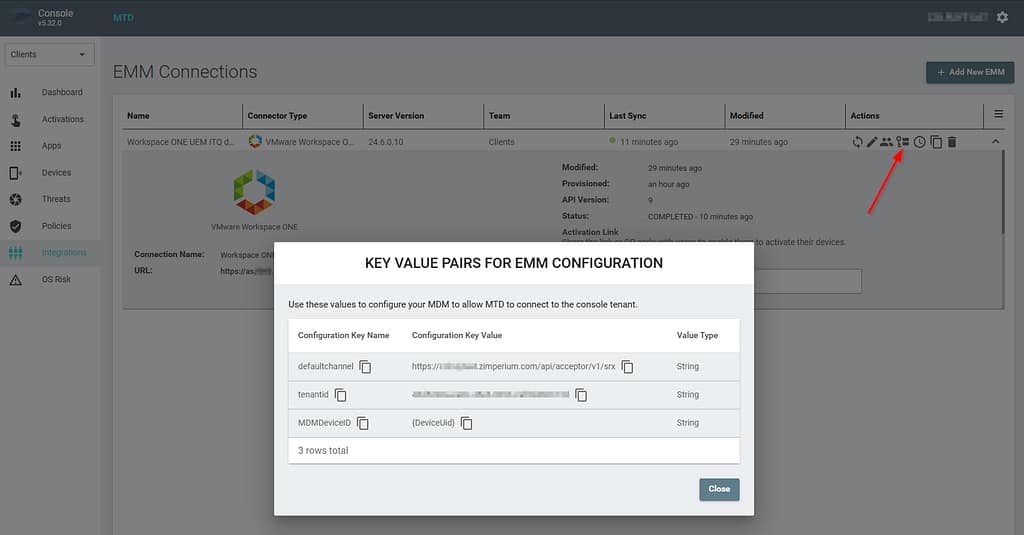
Add your values to the template below:
<characteristic type="com.airwatch.android.androidwork.app:com.zimperium.zips" uuid="8tmd320b-03b6-4bu7-a94d-787f1a1d6138">
	<parm name="defaultchannel" value="https://<tenant>.zimperium.com/api/acceptor/v1/srx" type="string" />
	<parm name="MDMDeviceID" value="{DeviceUid}" type="string" />
	<parm name="tenantid" value="<tenantID>"  type="string" />
	<parm name="tracking_id_1" value="{DeviceSerialNumber}" type="string" />
	<parm name="tracking_id_2" value="{DeviceFriendlyName}" type="string" />
	<parm name="display_eula" value="no" />
</characteristic>Note: you can modify the tracking_id_x attributes to anything you prefer.
Next, create a new profile in the UEM console (Devices > Provisioning > Components > Profiles)
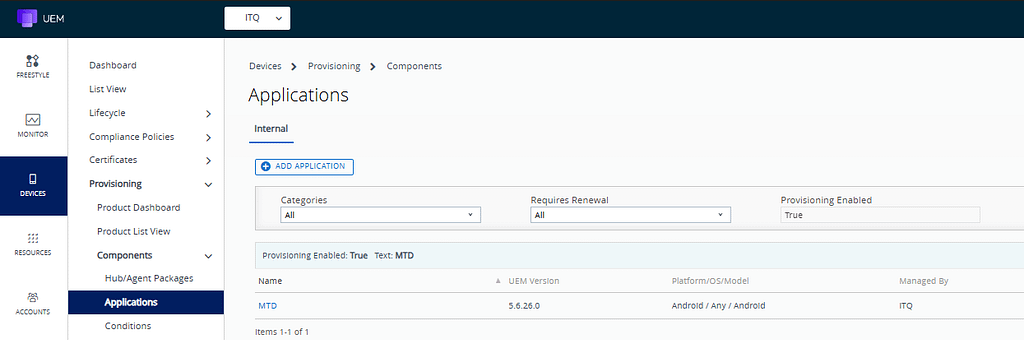
Zimperium MTD app
Upload the Zimperium MTD app to the console:
Doze mode exclusion
This profile will configure the Battery Optimization permission required for the Zimperium app.
Here’s the Zebra documentation on how to configure this: https://supportcommunity.zebra.com/s/article/000022884?language=en_US
And here’s the actual configuration for your convenience:
<wap-provisioningdoc>
<characteristic version="11.3" type="AppMgr">
<parm name="Action" value="BatteryOptimization" />
<parm name="AccessAppInfoAction" value="EnableAccessAllInfo" />
<parm name="RemovePackageNames" value="com.zimperium.zips" />
</characteristic>
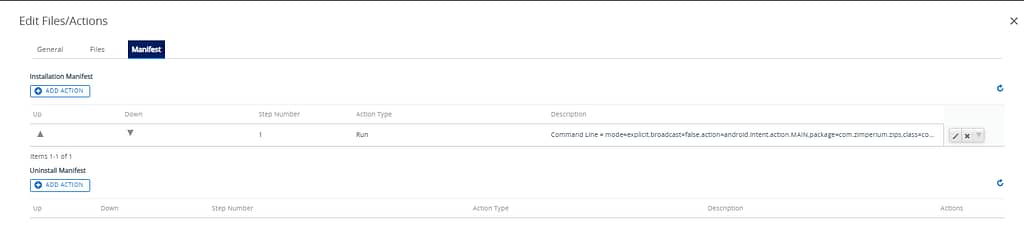
</wap-provisioningdoc>Add this to an xml file and build a files/actions component as follows:


Manage External Storage permission
The construction of the custom setting profile that configures the Manage External Storage permission takes a bit more work.
First, you’ll need to abstract the signing certificate from the APK using the App Signature Tool: https://techdocs.zebra.com/emdk-for-android/latest/samples/sigtools/
Here’s the exact command I used:
java.exe -jar SigTools.jar GetCert -INFORM APK -OUTFORM DER -IN "Zimperium MTD v5.6.26.apk" -OUTFILE Zimperium.crtNext, you can construct the custom setting xml using Zebra StageNow as described here:
https://supportcommunity.zebra.com/s/article/000026191?language=en_US
Which results in this profile:
<wap-provisioningdoc>
	<characteristic version="13.1" type="AccessMgr">
		<parm name="PermissionAccessAction" value="1" />
		<parm name="PermissionAccessPermissionName" value="android.permission.MANAGE_EXTERNAL_STORAGE" />
		<parm name="PermissionAccessPackageName" value="com.zimperium.zips" />
		<parm name="PermissionAccessSignature" value="MIIBoTCCAQqgAwIBAgIEUDu4sTANBgkqhkiG9w0BAQUFADAUMRIwEAYDVQQKEwl6SW1wZXJpdW0wIBcNMTIwODI3MTgxMzA1WhgPMjExMjA4MDMxODEzMDVaMBQxEjAQBgNVBAoTCXpJbXBlcml1bTCBnzANBgkqhkiG9w0BAQEFAAOBjQAwgYkCgYEAluXl3C64K80J00iAjHjRIn073I08n24xDhx2zaA/CzPKAebBrvthAKCrLZIklGWhfDz/H7B7f2F26ss5VKVjohnowuHcVQpuCiAOK0cLPfScGLSZ8+RZXvqjdRPCj+9yjJ+pWQuBiNBiwPscCfCG3gEob90Imrqn5BUKmGZx19kCAwEAATANBgkqhkiG9w0BAQUFAAOBgQBNO9FCaSqqWrwb+iTDAOQMttTma7oyJ/q1GTITZFC/EjlE1eVF1lYxLbFlvm+1BHKWra5pLOv0B3qHHDy7cRq3HMTbkgYDJdnBuTnDEwL45OMzJmwEHV7dRZprkewE07q48gG7FNmhIISutIgPfnzp2Tb+S0/2oDEO0OGGyz5UrA==" />
	</characteristic>
</wap-provisioningdoc>
First intent
Just pushing the app isn’t enough for it to get successfully registered in the MTD console. The app needs to be launched once as well. To achieve that, you can use intents in the product provisioning Files/Actions section.
Here’s the first intent:
mode=explicit,broadcast=false,action=android.intent.action.MAIN,package=com.zimperium.zips,class=com.zimperium.zips.ui.DormancyStartActivity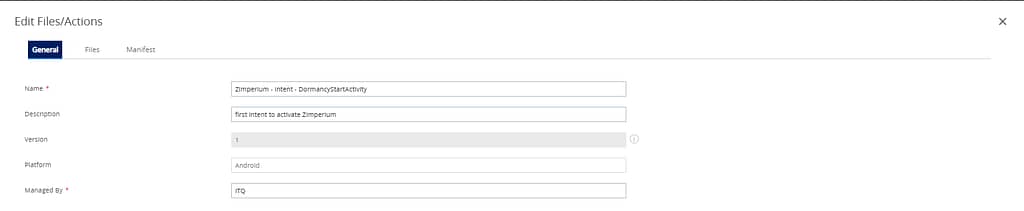

Second intent
Command line:
mode=explicit,broadcast=false,action=android.intent.action.MAIN,package=com.zimperium.zips,class=com.zimperium.zips.MainActivity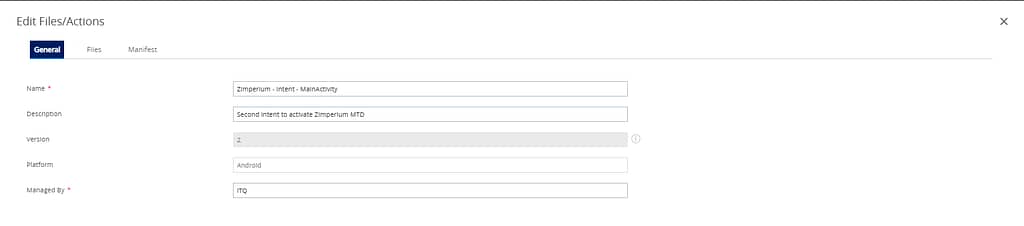
Note:
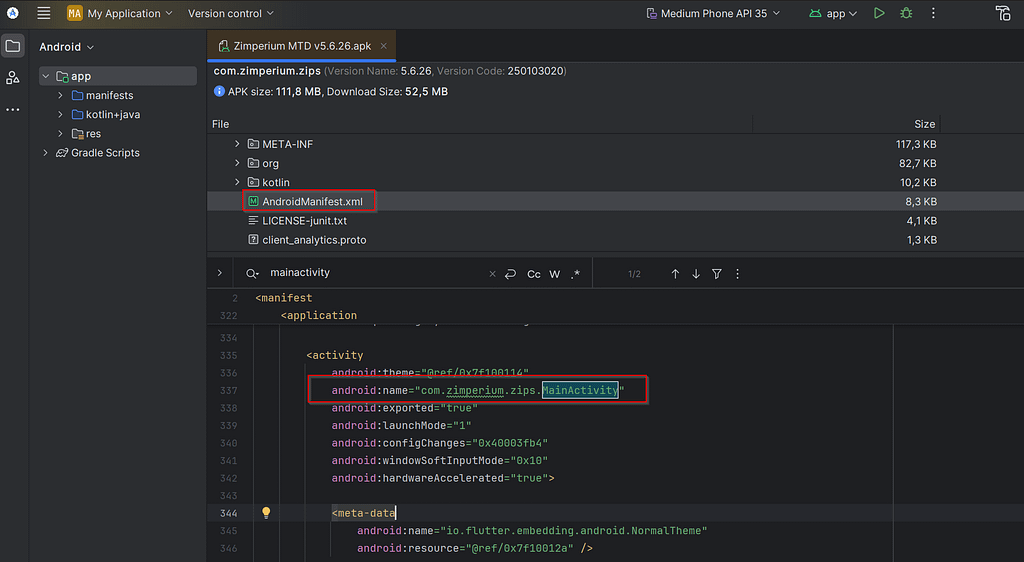
The blog created by Ryan years ago was using the intent
mode=explicit,broadcast=false,action=android.intent.action.MAIN,package=com.zimperium.zips,class=com.zimperium.zips.ZipsActivityUsing this intent in my product resulted in an error stating that the intent didn’t exist. While troubleshooting, I learned that by opening the APK file with Android Studio, you can check the AndroidManifest.xml file to see all the permissions and intents used by the app. That’s how I discovered that the activity was probably renamed to MainActivity:
Building the second product
To put all this together, we’ll need to create a second product that executes all these steps one-by-one:

For this second product to work as expected, we need to ensure the Zebra MX Service app is installed, so we need to add the first product as a dependency:
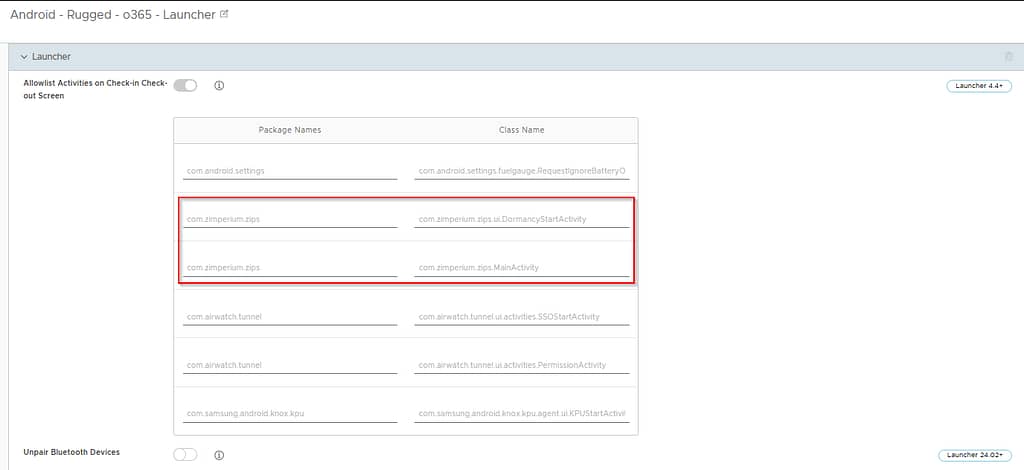
(Optional) Launcher profile modification
If you’re using Launcher, ensure it’s not blocking the initial launch of the MTD app, which is required to fully activate the app.
Samsung Devices
The process to configure Zimperium MTD on a fully managed device is somewhat similar (obviously). We’ll need the following things to get it working:
- App Permissions profile with an exception for Zimperium (*)
- A product that contains these items:
- An app config profile (*)
- MTD app installation (*)
- First intent to activate the MTD app (*)
- Second intent to activate the MTD app (*)
- Knox Service plugin installed on the device
- Manage External Storage permission configured
- Doze Mode Exclusion for the MTD app configured
- (optional if using Launcher) Launcher settings to allow MTD to activate itself. (*)
(*) identical to Zebra configuration.
NOTE: I tried to configure the Manage External Storage permission using custom settings profile. This way I could time everything perfectly. Sadly, I could not find a working XML format (and I’m not the only one). Now the intents in the product will launch the MTD app when the Doze Mode exclusion and manage external storage permission aren’t configured yet. They will be granted silently later when the Knox Service Plugin gets installed. Let me know if you figured out a better approach!
Knox Service Plugin app configuration
We’ll be distributing the Knox Service Plugin app as a public app through Google Play, so we can leverage its app config. The KSP app needs to be configured with following settings:
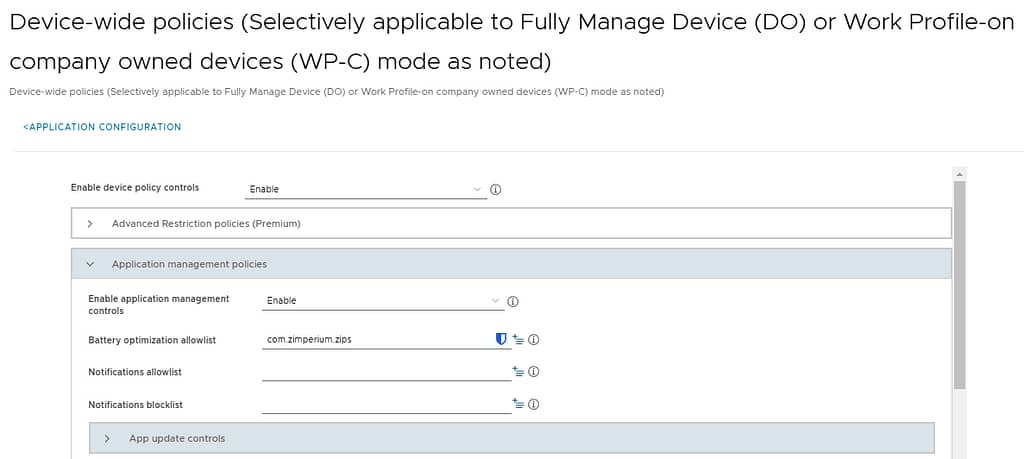
- Device-wide policies
- Enable device policy controls: enabled
- Application management policies
- Enable application management controls: enabled
- Battery optimization allowlist: com.zimperium.zips
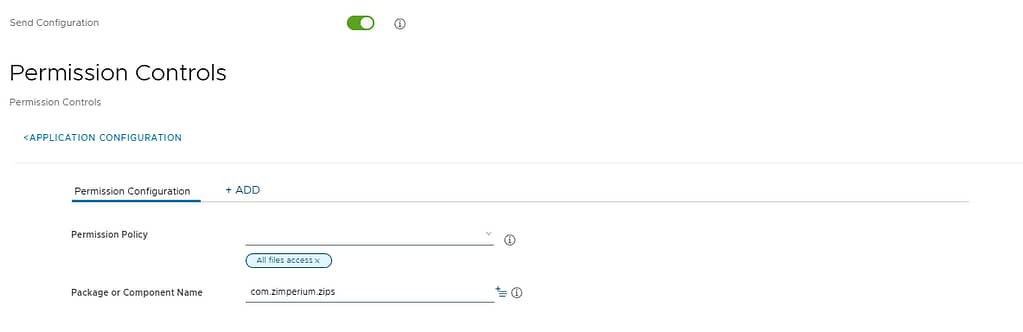
- Enable permission controls: enabled
- Permission Controls:
- Permission Policy: All File Access
- Package or component name: com.zimperium.zips
Conclusion
In an upcoming blog, I’ll integrate Workspace ONE Intelligence and configure some automation flows to remediate threats reported by Zimperium MTD!