Introduction
Here’s how to sync Workspace ONE data to Google’s Looker Studio, by leveraging BigQuery and Cloud Run functions with RBAC on the data in your BigQuery tables. This screen recording of the proof of concept I created uses just two Workspace ONE Intelligence reports and one service account. Everything else is configured in Google Cloud.
If you’d like to try this yourself: Looker Studio is free of charge! Other GCP features such as BigQuery aren’t though, so I had to set up billing in my GCP project. I was surprised to see though that after two days the total amount spent was 0.00006 euro.
Workspace ONE Intelligence
Let’s get started with the configuration on the Intelligence side. Super straight forward!
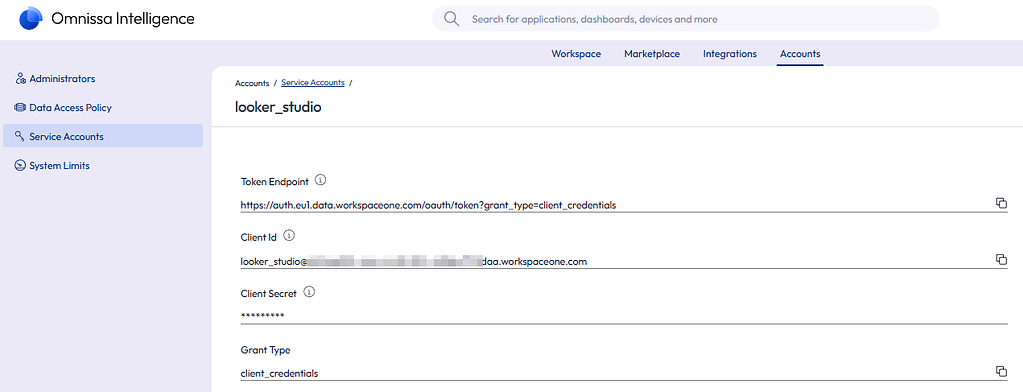
Service Account
First of all, we’ll need to create a service account that can be used by Google Cloud to trigger API calls that download the reports from Intelligence. Take note of all the values, as you’ll oviously need them later on.
Intelligence reports
I’ve created two very basic reports for this PoC:
- One that provides basic device information from Workspace ONE UEM:

- A second one that provides data from the Workspace ONE Intelligence SDK. I added a filter to only add devices to the report from Organization Groups that actually use Launcher:

Each of these reports has a unique report ID, which we’ll need later in the Google Cloud console. You can find this ID in the URL of your browser when you opened the report

Make sure you create a scheduled task for these reports. The functions in Google Cloud don’t create new downloadable reports (no such API exists), they simply download the latest available file.
As a final step, you have to share these reports with your service account:

Google Cloud Console
This is where it gets a little more interesting, but also where I got out of my comfort zone. Do keep that in mind if you’re copy pasting things to your environment!
From a high level standpoint, here’s what I did:
- There’s two Cloud Run functions (one for each Intelligence report) that make an API call to download the latest available report from Workspace ONE Intelligence.
- The data inside these csv files is then added to BigQuery tables.
- RBAC is set on the table’s rows that contain the Organization Group ID attribute. Hence admins can only see data from rows where the Organization Group matches the Workspace ONE UEM OG they have access to.
- a Cloud Schedule triggers the Cloud Run function on a daily basis to refresh and/or append the data in BigQuery.
- Lastly, I created data sources and reports in Looker Studio and shared these with the other admins.
Create Project
Start by creating a new project in GCP:

Next, in the GCP console, navigate to APIs & Services and ensure these services are enabled:
- BigQuery API
- Cloud Functions API
- Cloud Scheduler API
- Cloud Build API

We’ll also need a service account in GCP that can for example write data extracted from the Intelligence reports to BigQuery’s tables. Navigate to IAM & Admin -> Service accounts and create a new service account. Make sure to give it the proper permissions (screenshot #3):


BigQuery
Next, head to BigQuery and add a new dataset:


Quick and easy!
Cloud Run function (ETL)
In this next section, we’ll create our function that fetches reports from Workspace ONE Intelligence and feeds it to BigQuery. The function’s script itself is generic, allowing me to use the exact same code for both functions. Only the values of the variables INTEL_REPORT_ID and BQ_TABLE are different.
In the GCP console, head over to Cloud Run -> Services and create a new service. Select a name and a region, set the Runtime to Python and leave authentication disabled (for now, we’ll activate it later if we’re certain it works)

You also need to add your variables here, but that section is easy to miss. Expand the Containers, Volumes, Networking, Security pane at the bottom and in the Containers tab, there’s another tabbed section where you can select Variables and Secrets. Enter following Variables and their respective values:
- INTEL_CLIENT_ID
- INTEL_CLIENT_SECRET
- INTEL_TENANT_HOST
- INTEL_REPORT_ID
- BQ_PROJECT_ID (it’s the Google project ID)
- BQ_DATASET
- BQ_TABLE

I left everythign else at it’s default setting. Click Save to proceed to the next section.
You should now see the Source files page where you can add the script itself. Make sure to set the function entry point to “main”!

You can download the main.py script and the requirements.txt file from my GitHub repo.
Hit save and redeploy to commit the changes. You can then test the function by clicking the function’s launch URL:

If it worked fine, the webpage will display the number of lines imported from the report. You can also browse your BigQuery dataset in the BigQuery console UI if you want. Repeat this process for all other reports you want to sync to BigQuery.
Once you’re confident your functions are working fine, you can enable authentication on the security tab.

Next, give the Cloud Run Invoker permission to your service account:


Cloud Scheduler
You’ll probably want the data in your dashboards to be refreshed at a given interval, preferably in an automated fashion. Enter Google’s Cloud Scheduler.
To create a new scheduled job, in the GCP console, navigate to Cloud Scheduler and select Create Job. Set a frequency using unix-cron format (the example in the screenshot runs at 3AM every day.

Set Target Type to HTTP. the URL and Audience variable should match the function’s launch URL. Set auth header to Add OIDC token and select your service account.

You can force run the scheduled job to see if it runs successfully. If not, review the logs to see what’s going on. Create a scheduled task for each of your Cloud Run functions!
RBAC
In case you want to limit admins to see only data of devices belonging to the Workspace ONE UEM organization group they have access to, you can configure BigQuery Row-Level Security (RLS)
as a first step, you’ll need to create some user groups in admin.google.com (if you don’t have those already) and add your Workspace ONE UEM admins in them.


Next, head back to the GCP console -> IAM & admin and provide access to the BigQuery tables by giving the BigQuery Data Viewer and BigQuery Job User roles to these groups:

Lastly, for each of your Workspace ONE UEM OGs, run a sql query on all your BigQuery tables that sets the Row Level Security. You can edit the script on my Github to match your environment.
— 4808 (ITQ)
CREATE ROW ACCESS POLICY og_4808_policy
ON hidden-conquest-478613-i7.ws1_intelligence.devices_report
GRANT TO (“group:ws1-og-4808-admins@workspacewannes.be”)
FILTER USING (device_location_group_id = 4808);

There’s a button to verify the row access policies at the bottom!
That’s all on the GCP side. Let’s move on to the last section.
Looker Studio
There’s a couple more tasks waiting for us in the Looker Studio console. First, we’ll need to add Data Sources. Next we’ll create a report and add some widgets. Lastly, we should not forget to share all these items with our other admins.
Data Sources
In the Looker Studio console left upper corner, hit the Create button and select Data Source. On the next screen, select Bigquery. You should be able to see your Project, Dataset and Table(s). Once you selected the proper table, click Connect.
On the next screen, set data credentials to viewer

at the right upper corner, select share to share the data source with your other admins.

Looker Studio Reports
This final step is the configuration of the report with shiny dashboards. Here’s an example of how I configured one of these widgets:

it uses functions in the Metric fields, which in turn rely on custom parameters:


conclusion
This one was another fun challenge to tackle! I hope I covered it all, but if something isn’t clear or you need help setting it up, feel free to reach out in the comment section!