I’ve been testing the ServiceNow CMDB integration with Workspace ONE lately for a project I’m working on. Since I have no experience whatsoever working with ServiceNow, I was struggling a bit to get it working with the documentation available. Hopefully I can save some of you some time with this tutorial, because without any experience the ServiceNow platform can truly feel overwhelming.
I’ll start with describing the initial configuration of the Service Graph Connector for Workspace ONE application as detailed as possible. Next, I’ll show how I was able to sync additional device attributes collected by Workspace ONE Sensors to the SNOW CMDB.
Again, I’m not a ServiceNow specialist, so I’m not certain I’m doing everything as it’s supposed to be done. So please do get in touch if you spot potential improvements, security risks or configuration errors! I promise I will not feel offended 😉
I’ve used following components for this task:
- Workspace ONE UEM v23.5
- A ServiceNow developer tenant (Utah release)
- Workspace ONE Intelligence
- Postman
Integration with ServiceNow CMDB
First of all, you’ll need to request your free SNOW developer tenant on https://developer.servicenow.com/dev.do#!/home.
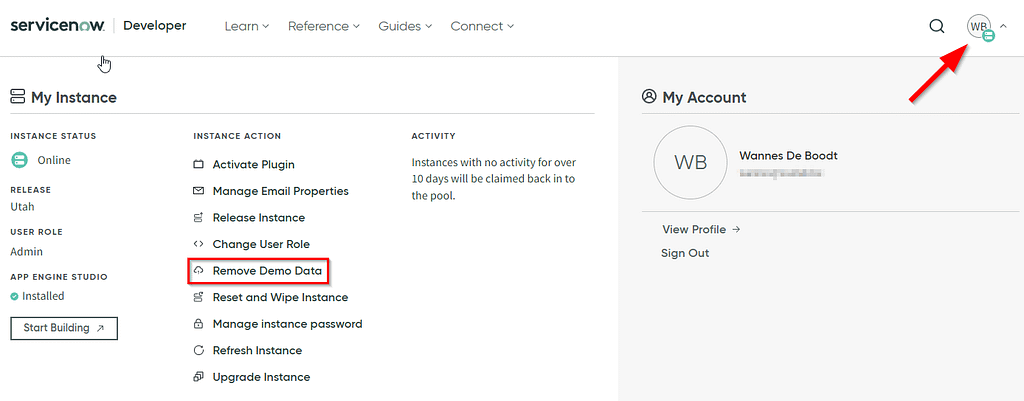
I opted to remove the Demo Data that’s automatically populated in the tenant, but that’s up to you. Do note that the process takes quite some time to complete!
ServiceNow prerequisites
Once you got that tenant up and running, it’s just a matter of following the (high level) instructions on this KB.
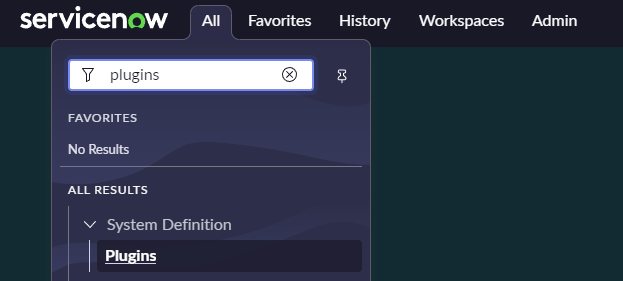
First of all, you have to enable the “ITOM Discovery License” plugin (com.snc.itom.discovery.license). To do so, follow along with the screenshots below:


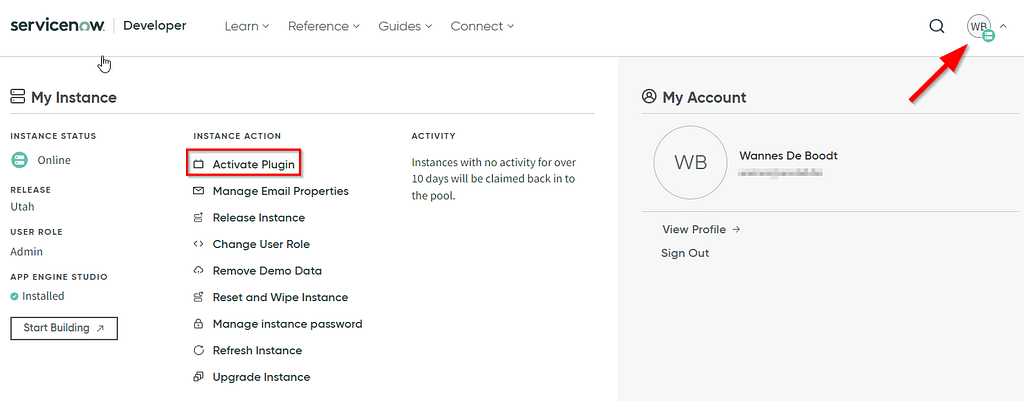
The second step for the SNOW prerequisites is to activate the “Discovery plugin”. Navigate back to the developer tenant portal, click on your account icon and select Activate plugin. The installation process took a very long time to complete, but you’ll receive an email notification when it’s ready.

Service Graph Connector for Workspace ONE UEM Installation
ServiceNow offers an application to sync your devices and applications from Workspace ONE to their CMDB. Some important things to consider here:
- The application is built and maintained by ServiceNow. I highly doubt you can contact VMware for support.
- The use of this application has an impact on your ServiceNow billing (which is not relevant for the developer tenant I’m using here).
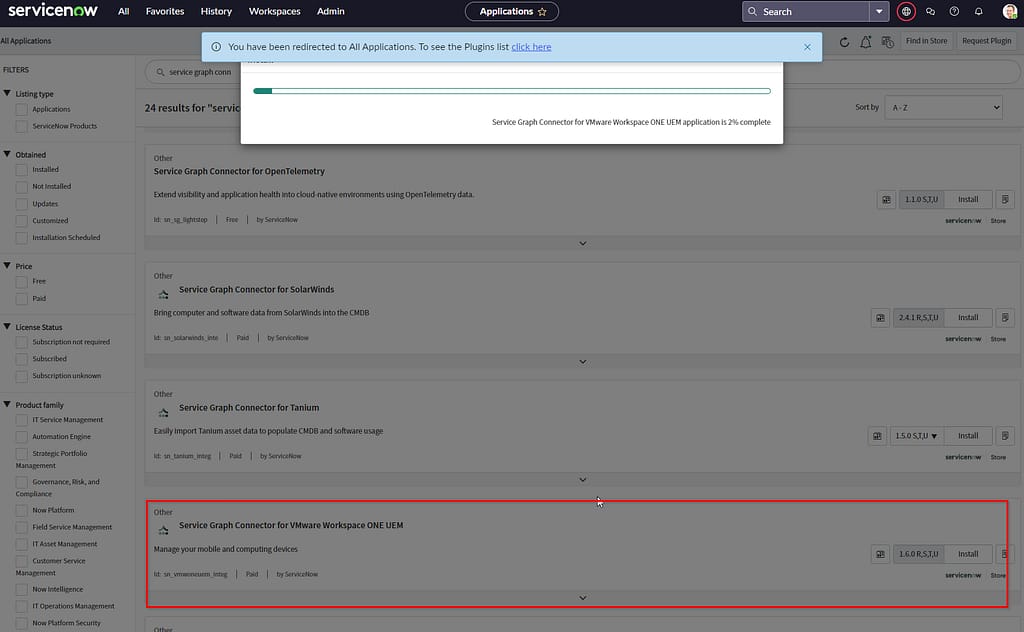
The installation of this application is again very straight forward (and time consuming). Head back to the Plugins page, search for the Graph Connector, press install and grab a coffee.
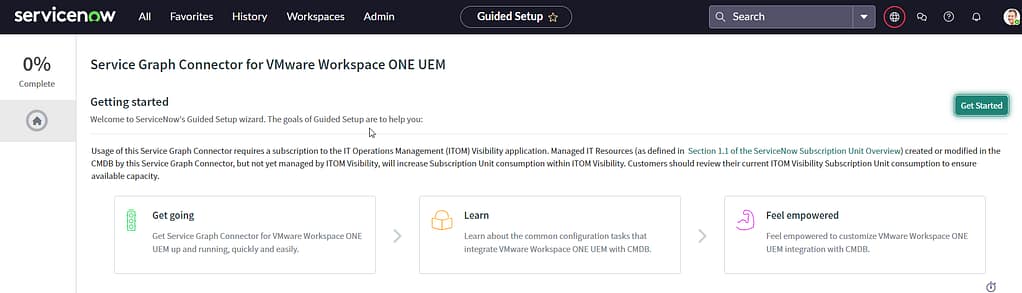
Service Graph Connector Configuration
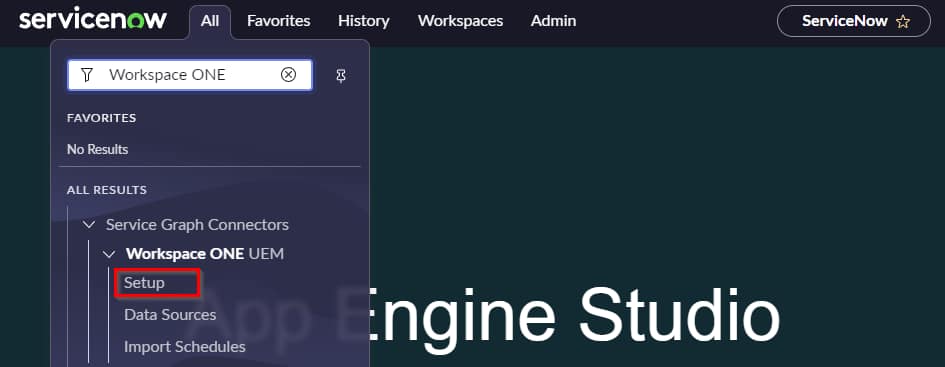
Once the connector is installed, it requires some configuration. Locate the application setup page in the ServiceNow tenant here:
The first step is to set up authentication. I don’t see a valid reason not to use OAuth credentials, so we’ll create some in the Workspace ONE tenant first.
In the console, navigate to Groups & Settings > Configurations > OAuth Client Management and select Add:
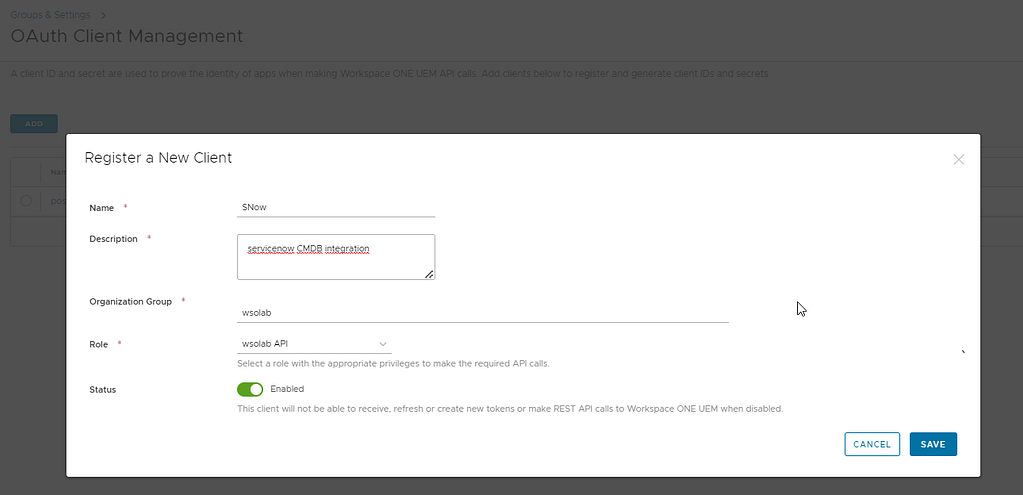
Take note of the Client ID and secret, you’ll need them again in the SNOW tenant.
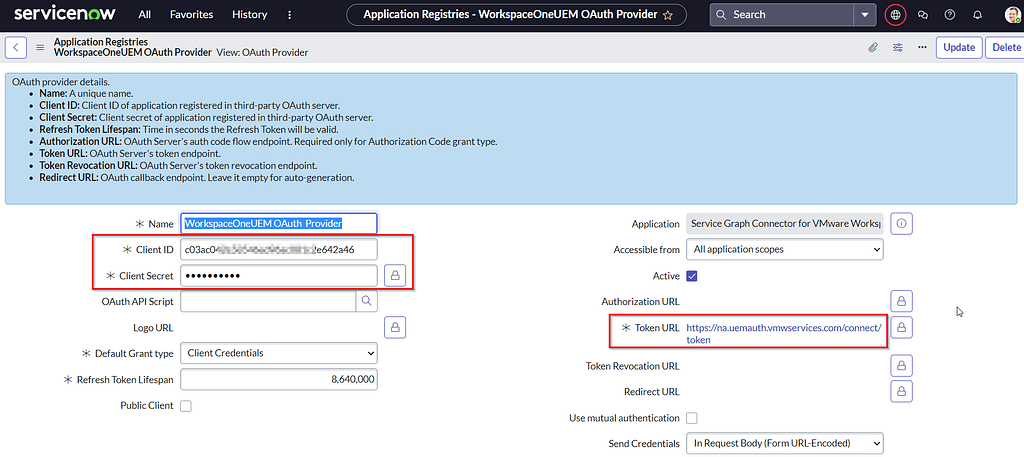
For more info related to REST API admin roles and to figure out what OAuth token URL you should use, reference this VMware KB.
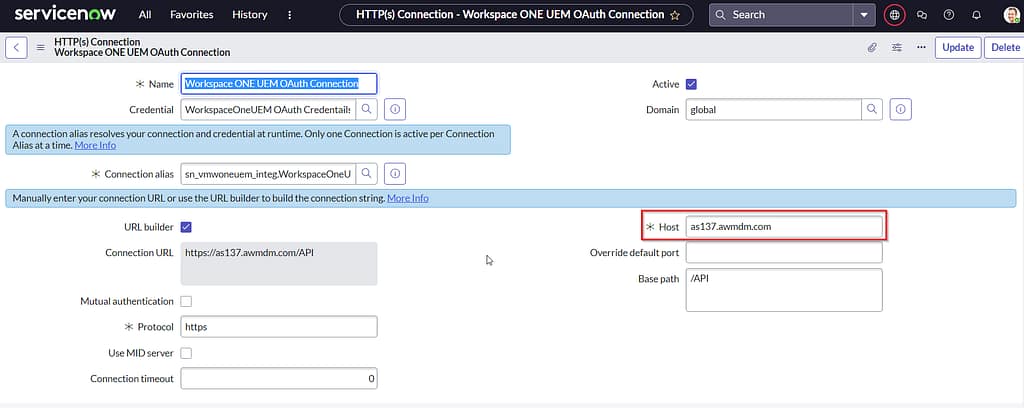
Back in the ServiceNow tenant, configure the authentication details as shown in the screenshots below:

Once you’re done, select Update. You’ll be redirected back to the start page, where you should press “Mark as complete” to be able to advance to the next step.
In that second step, we’ll be configuring the HTTP connection settings. You’ll need your Workspace ONE REST API URL, which you can find in the UEM console by navigating to Groups & Settings > All Settings > System > Advanced > Site URLs > REST API URL.
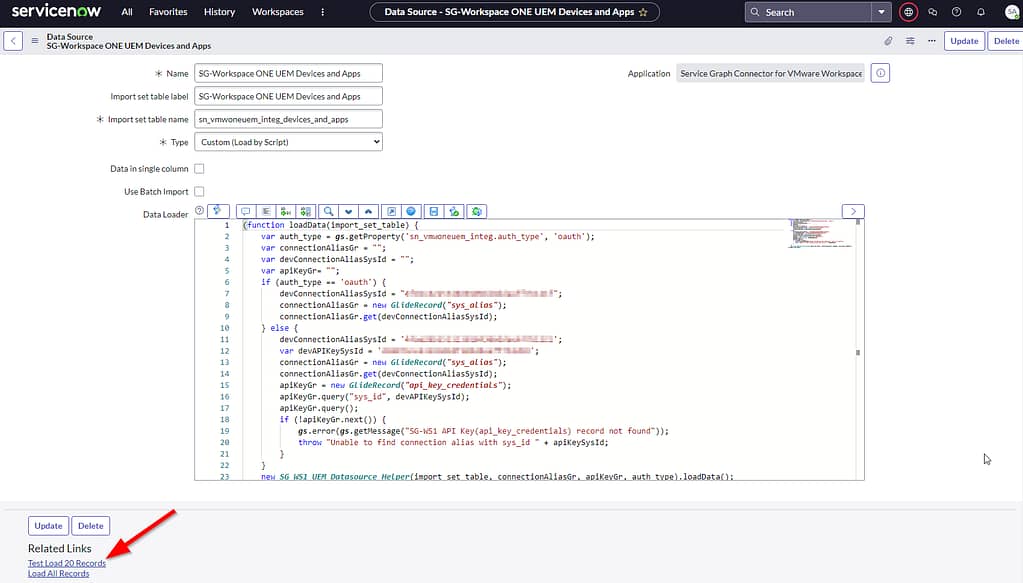
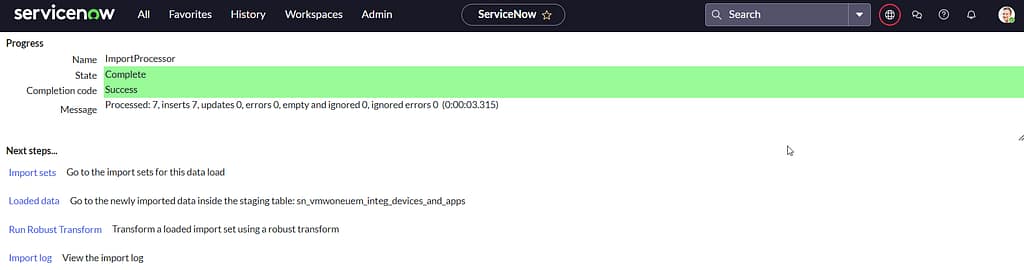
It’s time to test our configuration in the last mandatory step, “Validate data sources“. I didn’t need to modify anything on this page, I just selected “test load 20 records” and it worked. Gold!
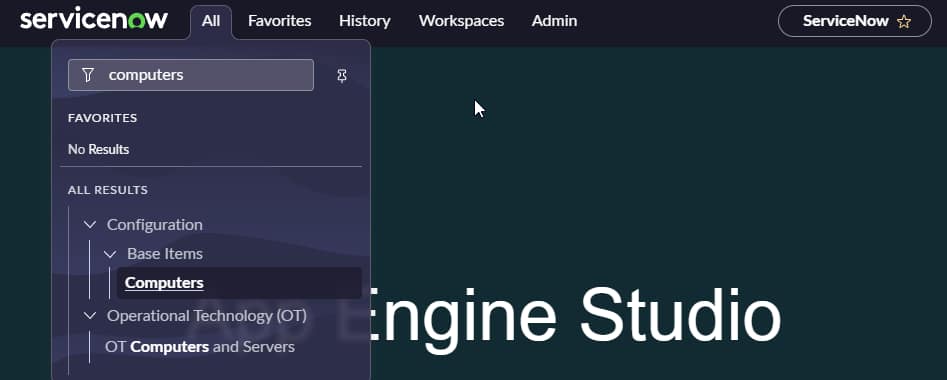
If you were lucky as well, you should be able to find your Workspace ONE managed devices in the ServiceNow CMDB. Here’s one location to find them:
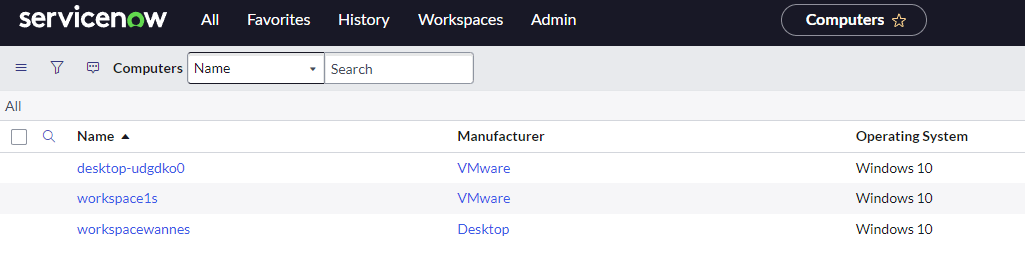
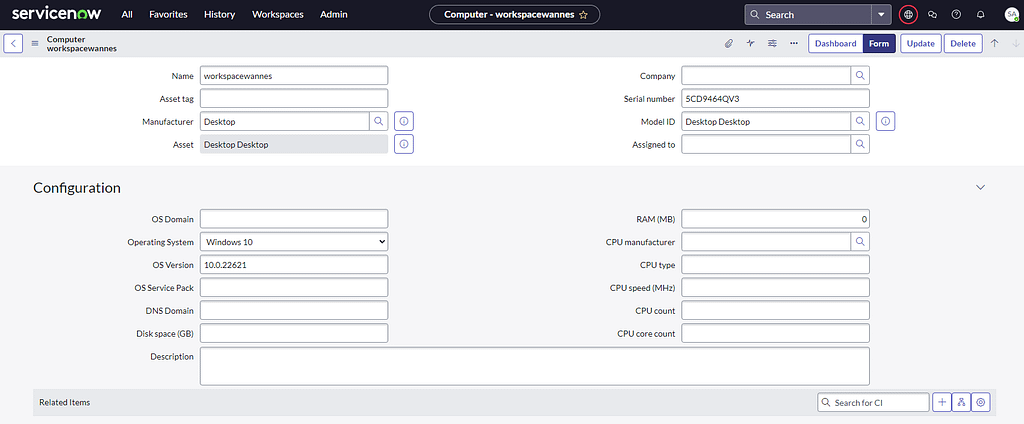
Now if you open one of these records, you’ll see that not many of the attributes have been populated. That’s simply because they aren’t natively collected by Workspace ONE. It’s also the real reason for me documenting this tutorial.
In the next sections, i’ll demonstrate how we can collect the data for these missing attributes and sync them to your CMDB.
Workspace ONE Sensors
Collecting the data for these attributes is rather straight forward asyou just need to create some sensors, so I won’t spend too much time on this. However, I should mention I bumped into an issue I have yet to troubleshoot: At first I was using the Integer data type for some of these sensors, which resulted in an error later on. Due to time constraints, I decided to carry on using String values instead as they worked as expected.
| Name | Response Data Type | Code |
| disk_space | String | $result = (Get-WmiObject -Class Win32_logicaldisk | where DeviceID -eq “C:”).FreeSpace $result /1Gb |
| chassis_type | String | [int[]]$chassisType = Get-CimInstance Win32_SystemEnclosure | Select-Object -ExpandProperty ChassisTypes switch ($chassisType) { { $_ -in 3, 4, 5, 6, 7, 15, 16 } { $result= ‘Desktop’ } { $_ -in 8, 9, 10, 11, 12, 14, 18, 21, 31, 32 } { $result= ‘Laptop’ } { $_ -in 30 } { $result= ‘Tablet’ } { $_ -in 17, 23 } { $result= ‘Server’ } Default { $result= “Chassistype is $chassisTypeInt” } } return $result |
| cpu_type | String | (Get-CimInstance -Class CIM_Processor).ProcessorType |
| cpu_speed | String | (Get-CimInstance -Class CIM_Processor).MaxClockSpeed |
| cpu_name | String | (Get-CimInstance -Class CIM_Processor).Name |
| cpu_count | String | (Get-WmiObject -class Win32_ComputerSystem).NumberOfProcessors |
| cpu_core_count_string | String | (Get-WmiObject -class Win32_processor).NumberOfCores |
| cpu_manufacturer | String | (Get-WmiObject -Class Win32_Processor).Manufacturer |
Assign them to your target devices and wait for them to return data.
ServiceNow Scripted REST API to the rescue
Great, we’ve got the data we want to send to ServiceNow. All we have to do now, is find a way to get it over there. At first I started looking at how I could tweak the Service Grap Connector to fullfil my needs, but quickly realized that is way to complex given my absolute lack of experience on the platform.
Luckily, I bumped into this excellent session around SNOW Scripted REST API: CCB0118 – Taking Import Sets to the Next Level with Scripted REST APIs. The speaker explained the Scripted REST API feature so convincingly, that I felt the urge to give it a try as well. It’s most likely dumb luck, but I got my sensor data successfully populated in my SNOW CMDB records only 2 hours after watching that video.
Scripted REST API setup
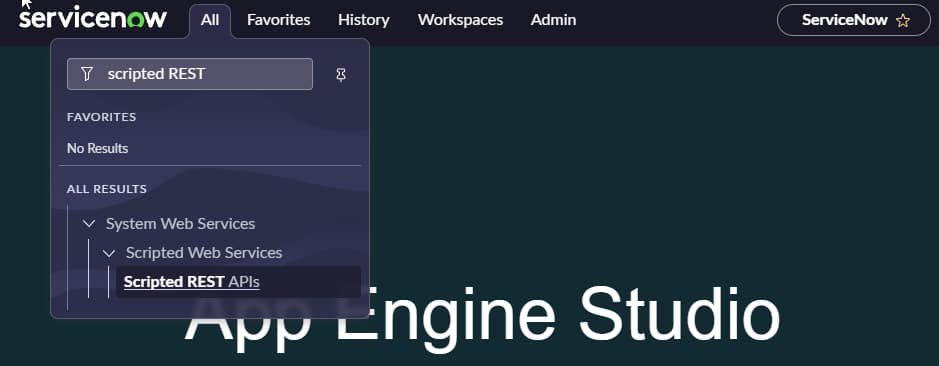
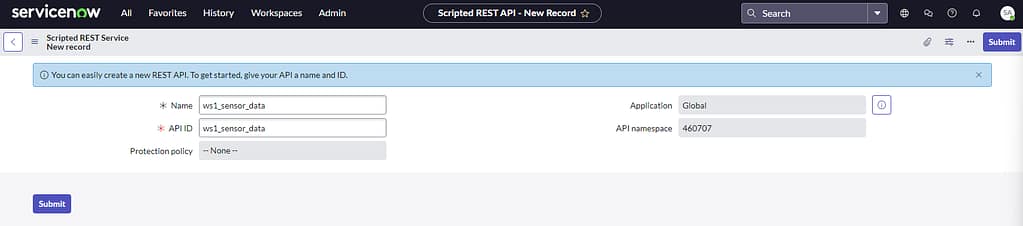
First, we’ll need a service listening to our incoming API requests, so we need to set up a new endpoint. Navigate to the Scripted REST API page and select NEW.
Give it a name. The API ID will auto-populate.
Once submitted, we need to create a Resource at the bottom section. These resources define what HTTP methods (GET, POST, PATCH,…) you can use in your API calls towards this endpoint.
For starters, I chose to only allow the PATCH method to update existing SNOW records already created through the Service Graph Connector, but it’s perfectly possible to create new objects as well (using the POST method).
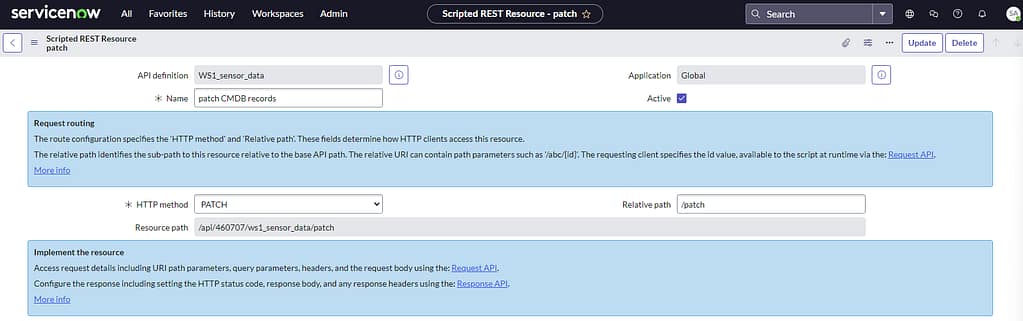
In the script section, I created a basic script that examines the incoming API call’s payload and creates some variables. Next, it will search the cmdb_ci_computer table in SNOW and try to find a match for the serial number.
If it does find a match, it will populate certain attributes for that record based on what values were received in the incoming payload.
If it fails to find a matching serialnumber in the CMDB table however, it return a 400 error.
(function process( /*RESTAPIRequest*/ request, /*RESTAPIResponse*/ response) {


    this.status = '200';
    var respObj = {}; //declare the response object
    var payload = request.body.data;  //retrieving the JSON body
    var serial_number = payload.serial_number;  //getting the serialnumber from JSON
    var cpu_core_count = payload.cpu_core_count;
    var cpu_count = payload.cpu_count;
	var cpu_speed = payload.cpu_speed;
	var cpu_type = payload.cpu_type;
	var cpu_name = payload.cpu_name;
	var chassis_type = payload.chassis_type;


    var gr = new GlideRecord("cmdb_ci_computer");
    gr.addQuery('serial_number','=',serial_number);
    gr.query();
    if (gr.next()) { // To update data on the existing incidents

        gr.serial_number = serial_number;
        gr.cpu_core_count = cpu_core_count;
        gr.cpu_count = cpu_count;
		gr.cpu_speed = cpu_speed;
		gr.cpu_type = cpu_type;
		gr.cpu_name = cpu_name;
		gr.chassis_type = chassis_type;

        gr.update();

        this.status = '200';
        respObj.body = {
            "message": "Update Successful!",
            "detail": "device " + gr.serial_number + " updated successfully"
        };
    }

	else { //ignore the request if there is no serial_number
        this.status = '400';
        respObj.body = {
            "message": "Request Ignored, serial number is missing",
            "detail": "Serial number is missing in the Request"
        };

    }

    if (this.status == '200') {
        response.setBody(respObj);
        response.setStatus(this.status);
        return response;
    } else {
        var setError= new sn_ws_err.ServiceError();  //this API used to set the custom error messages
        setError.setStatus(this.status);
        setError.setMessage(respObj.body.message);
        setError.setDetail(respObj.body.detail);
        return setError;
    }

})(request, response);
ServiceNow Oauth credentials
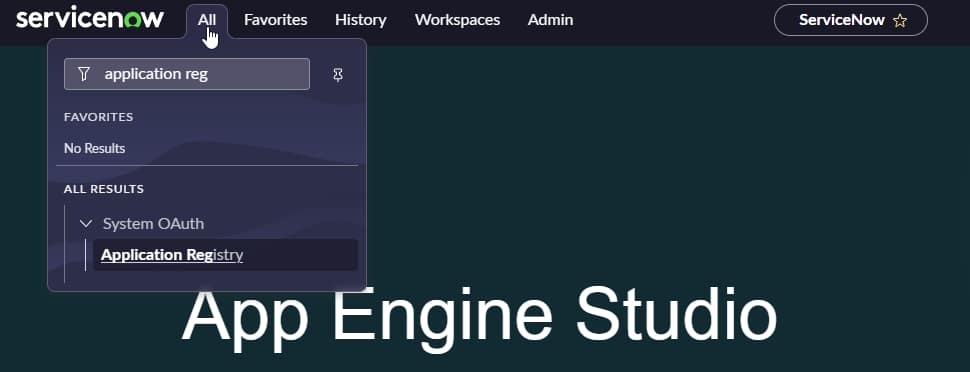
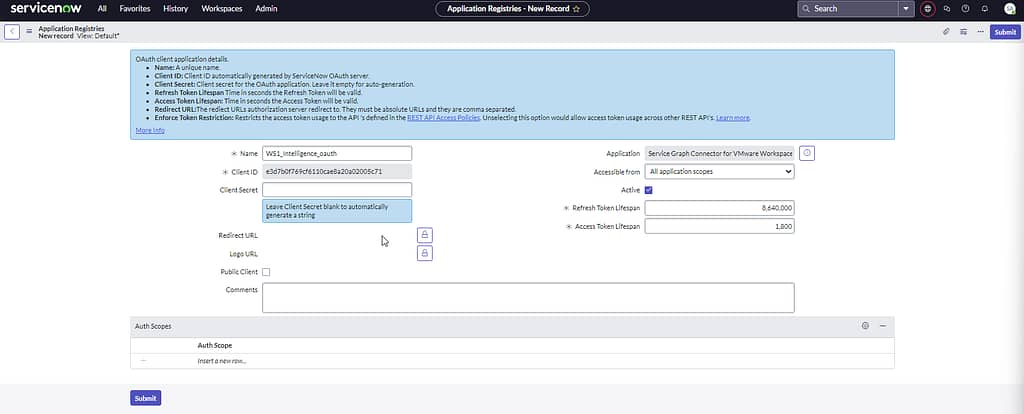
For obvious reasons we want our API calls to be authenticated, so we’ll need to create some OAuth credentials in ServiceNow as well.
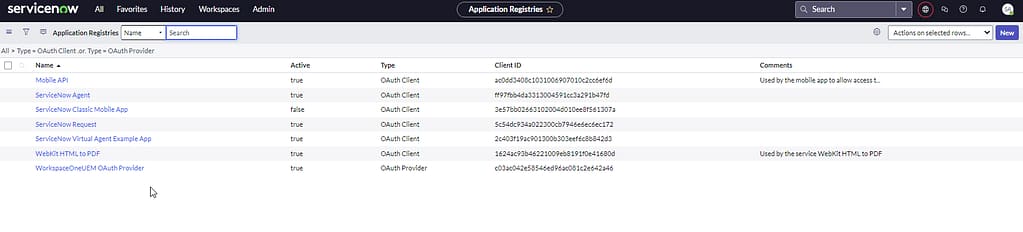
These can be created on the Application Registry page:
Select NEW on the Application Registries page:
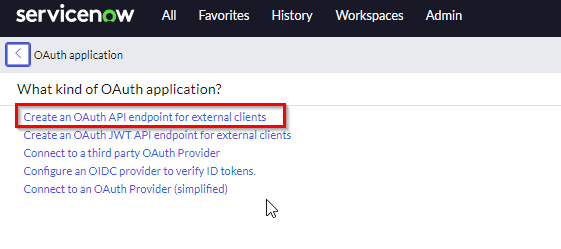
Select OAuth API endpoint for external clients:
Provide a name and click next. Take note of your Client ID and secret, as we’ll need them in the following sections:
Postman API calls
Allright, time to build some API calls using Postman and see if we get this thing to work. For the purpose of this little project, Ive created 3 API calls. You can download them from my Github, just modify the tenant URLs to match your own environment.
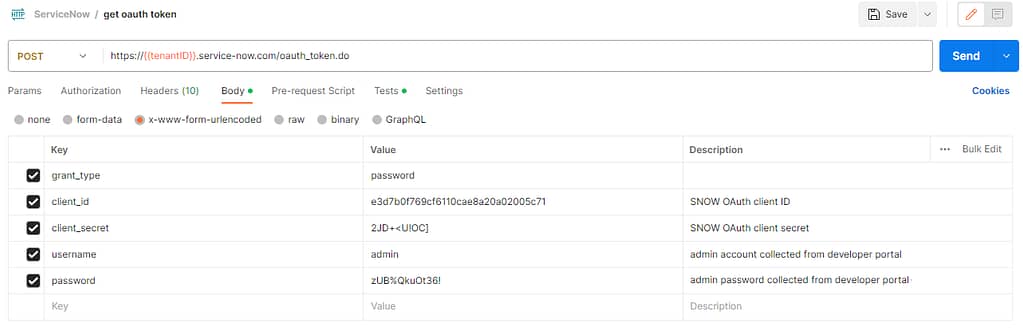
The first API is used to request on OAuth token needed for any following requests. To build this API, you’ll need to collect your ServiceNow admin credentials (or create a dedicated account for that purpose of course):

Back in Postman, build a new POST call like shown below:
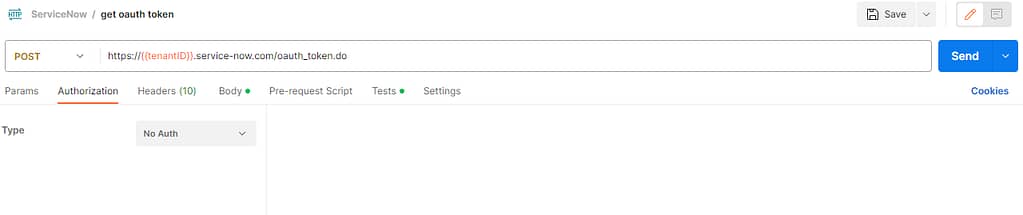
If you want to auto-save the OAuth token you received from the call into a variable (“access_token” in my case) that you can use in subsequent API requests, you can optionally add this code to the Tests section:

After hitting the send button, you should see a “200 OK” response containing your OAuth access token:

The second API call I added to the collection is used to query a specific device, just so I can see the attributes in there. You need to obtain the sys_ID attribute first of the record you are querying for and add that to the URL. As we don’t really need it for the purpose of this blog, I’m not going to discuss it any further. But it’s in the Postman collection I uploaded on Github.
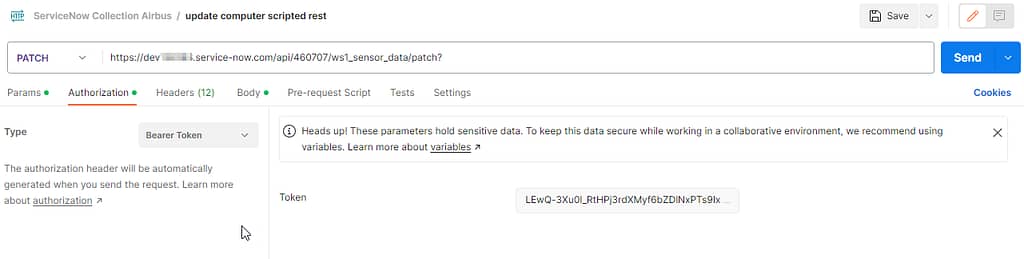
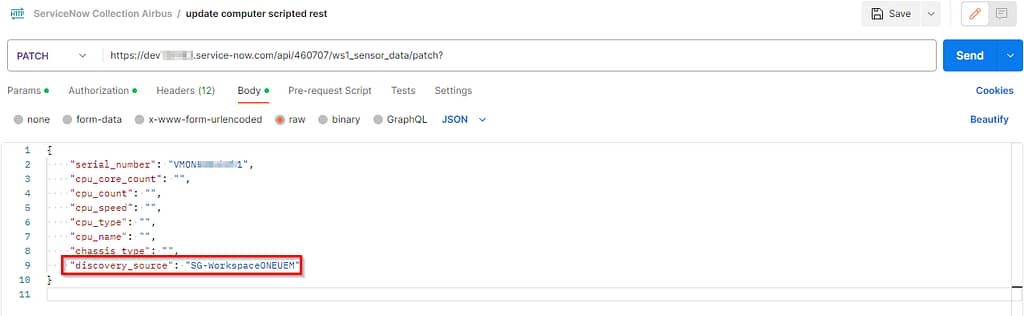
Lastly, I created an API call that actually performs the update on the SNOW CMDB record.
You’ll need to paste the token received with the first call on the Authentication tab and set it to use Bearer token as the authentication type (Normally I would use the automatic variable I mentioned earlier, but Workspace ONE intelligence doesn’t know how to deal with them).
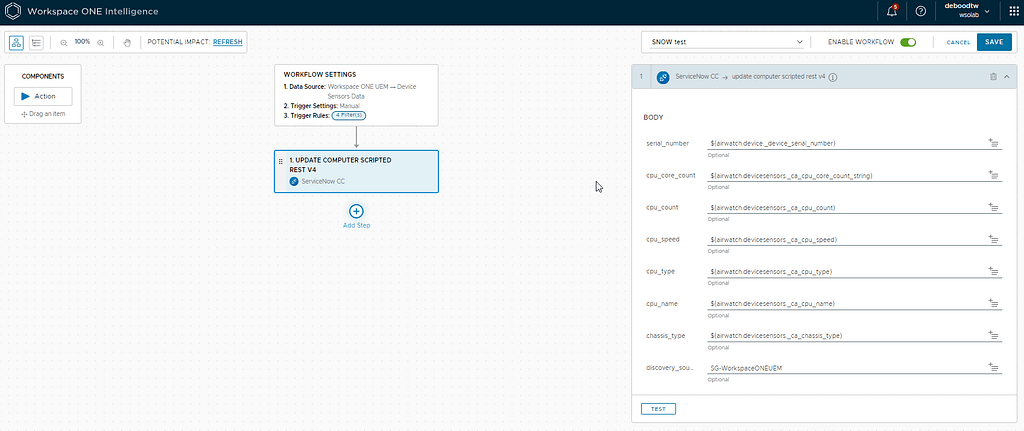
In the body section, add the attributes you want to update using sensor values. Adding the discovery_source value as shown in the screenshot is mandatory for the API call to be successful.
PS: Notice that I matched the SNOW attribute name in both my sensors and API body, but that’s not a requirement. It does make my life easier though.
Lastly, export your collection from Postman, so we can upload it to Workspace ONE Intelligence in the last section.
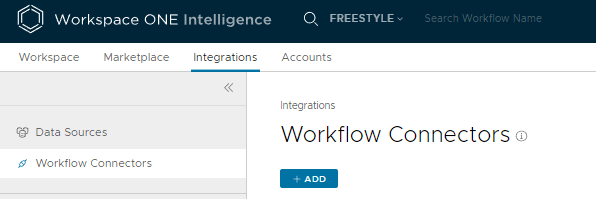
Workspace ONE Freestyle on Intelligence Setup
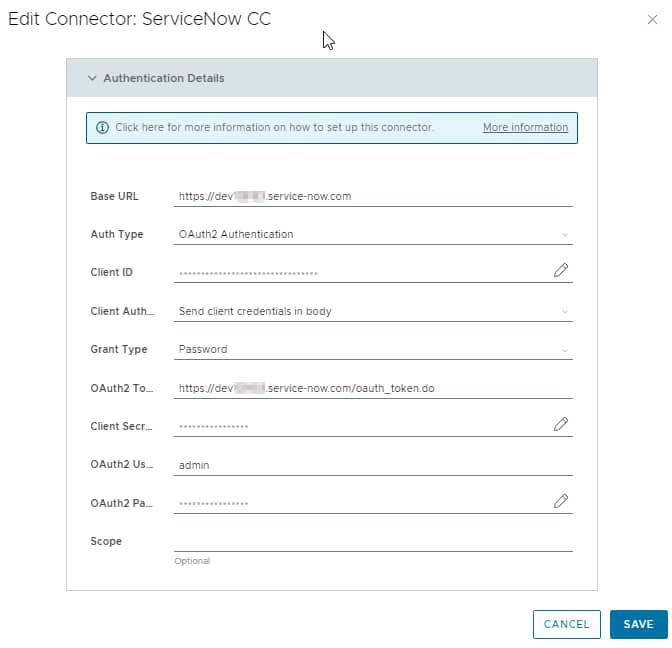
Since we’re doing custom stuff, we’ll need a custom connector in Workspace ONE Intelligence. Navigate to Integrations > Workflow connectors and select ADD:
Use the same set of credentials you’ve used to build the first API call in Postman to complete the Connector configuration page:
Open the custom connector > Actions tab and select Import Actions:

For those looking for more information around custom connectors in Intelligence, reference VMware’s KB article here.
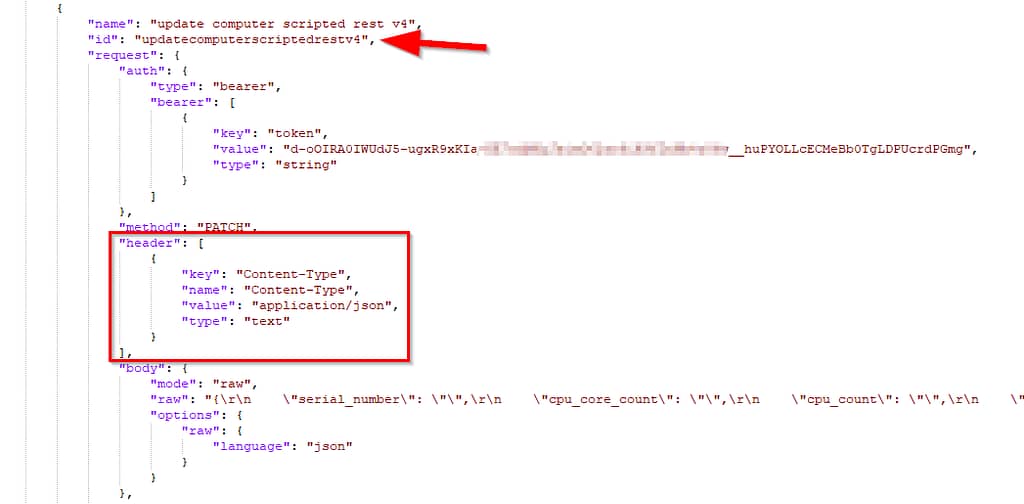
I bumped into a couple of minor issues at my first upload attempts, mentioning things like ‘missing ID’ or ‘header content-type missing’. Make sure these are added correctly in your Postman export:
The very final step is to create an Automation flow which looks like this one:

Add your sensors to the body as shown below:
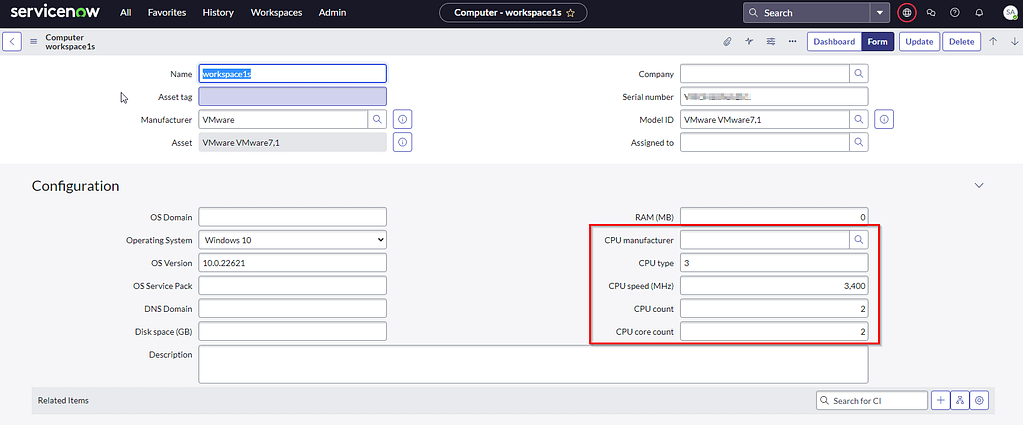
If you managed to reach this point, you should see the attributes popping up in SNOW immediately after running your Automation Flow:
Good luck!